Thursday, December 22, 2016

Pavtube ByteCopy Upgrade to 4.9.0.0 - Support MKB62

Pavtube ByteCopy upgraded to support newest NVIDIA CUDA & AMD APP technology in video decoding to improve performance and ensure users much faster conversion speed than ever before when coping/ripping/converting DVD/Blu-ray, since more CPU resources are spared because of NVIDIA CUDA's harnessing the power of GPU and AMD APP's co-using of GPU and CPU.What's New
  • New version: v4.9.0.0 (12.20 2016 )
  • Support newest NVIDIA CUDA & AMD APP technology to accelerate video encoding/decoding by both H.264 and H.265/HEVC codec. Note: H.265 CUDA depends on whether your computer is geared up with H.265 encoding capable graphics card. Please refer to the document on official website of nvidia:https://developer.nvidia.com/nvidia-video-codec-sdk
  • Further added support for latest Blu-ray MKB v62
  • Improved handling for location seeking issues on BD and some VOB files
Refer to:
Enable H.265 CUDA in ByteCopy

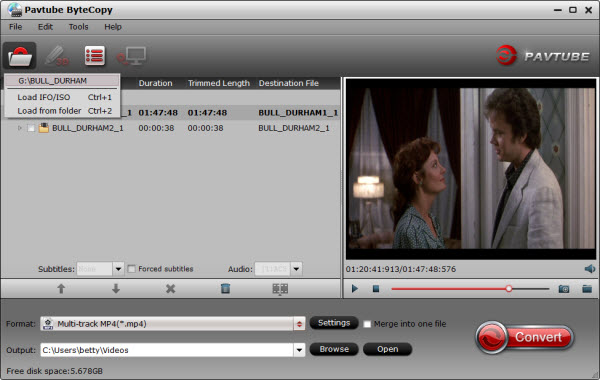
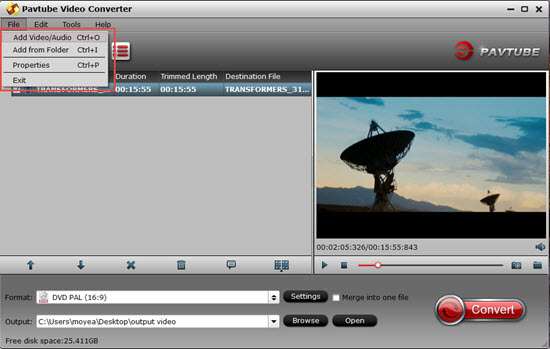
Simply click "File" > "Load from Disc" to load your Blu-ray and DVD movies. Then Choose "H.265 MP4 Video" in"Format" drop-down list. Now, move your cursor to "Tools" button on the top of the main interface to choose"Options". Then you can enable GPU acceleration.


Here below is a comparison table of our own experiment result, which shall give you a better understanding of how H.265 CUDA works, in a more direct and visual way. Check it out.

Hardware & System
Source
Conversion Profile
Non-H.265 CUDA
H.265 CUDA
Win 7 64-Bit
CPU: i5-4440
GPU: NVIDIA GTX-960
RAM: 4G
BD:The.Hobbit.The.
Desolation.Of.Smaug.iso
mp4.h265
5:14:48
0:18:35
Win 7 64-Bit
CPU: i5-4440
GPU: NVIDIA GTX-960
RAM: 4G
DVD: INSURGENT.iso
mp4.h265
1:00:27
0:06:35

Download sites:
All features

Pavtube ByteCopy is a free-to-try Blu-ray ripping application for Windows that features simple and user-friendly tools and functionalities for all your video needs. It is designed to rip commercial BluRay movies as well as convert DVDs into MKV format with ease. It also features powerful BD decryption utilities enabling users to remove copy protections on all BluRay discs.

* Reads DVD and Blu-ray discs
* Reads DVD-Video(VIDEO_TS.IFO) folder, Blu-ray(BDMV) folder and ISO files
* Reads Blu-ray discs protected with latest versions of AACS, BD+, MKB v61, MKB v62.
* Preserves all video and audio tracks, including HD audio
* Preserves chapters information
* Rip BD/DVD to lossless/uncompressed MKV container
* Fast conversion - converts as fast as your drive can read data.
* No additional software is required for conversion or decryption.
* Convert BD/DVD to MP4 wrapper with multiple subtitle/audio tracks.
* Add subtitles to BD/DVD and extract SRT subtitles from BD/DVD
* Rip Blu-ray/DVD to FLAC, WMA, MKV, MP3, etc audio files.Other NVIDIA CUDA & AMD APP Supported Pavtube Products

Guides and How to's

Wednesday, December 21, 2016

The Best MacOS Sierra Blu-ray Ripper Tool

Apple's latest Mac operating system, macOS Sierra, comes in the fall 2016. It includes features like auto unlocking via Apple Watch and Siri integration. Sadly, MacOS Sierra still doesn't sport Blu-ray drives and Blu-ray playback software and probably never will, so why bother?

What's new?

1.New version number 4.9.0.0
2.New graphics cards added in GPU acceleration list(include H.264/H.265) Click Here to get the support list:http://www.pavtube.com/nvidia-cuda-speedup.html
Whether to support H.265 acceleration depends on the graphicscard model, please refer to the document on official website of nvidia:https://developer.nvidia.com/nvidia-video-codec-sdk
3.support latest Blu-ray MKB62
4.Solve the seeking problem between BD and part of VOB video


Instead of fretting about this and going off to re-purcahse all your content on iTunes so that you can watch it on your iOS devices, Mac computers, and Apple TV, maybe you should consider ripping your Blu-Ray content on MacOS Sierra.


To get the movies off of Blu-ray discs on MacOS Sierra, you're going to need a third-party tool to decrypt the data on your discs. In fact, there are many programs out there that allow you to make copies of your Blu-rays and let you want to watch them you want to view them. If you are seeking for the best video output quality, fastest video conversion speed, and the most formats supported, Pavtube Blu-ray Ripper for Mac (compatible with MacOS Sierra) will be your best choice. Also it has other features that will impress you.


MacOS Sierra Review: Best DVD Decrypter for macOS Sierra | Video Converters for macOS Sierra | Blu-ray Ripper for macOS Sierra

* Convert Blu-ray/DVD to MP4, AVI, M4V, MKV, FLV, MOV, MPG, etc videos with excellent and unmatchable ripping-converting speed while preserving HD quality.
* Superior support any kinds of Blu-ray and DVD
* Backup any Blu-ray/DVD movies with 100% original quality
* Support 150+ ready presets for portable multimedia devices
* Edit and touch up Blu-ray/DVD movies as you like

P.S. For those who want to convert and rip Blu-ray files on Windows (Windows 10 included) PCs, please turn to Pavtube Blu-ray Ripper for Windows.

Download the best Blu-ray Ripper for MacOS Sierra:


Other Download:
- Pavtube old official address: http://www.pavtube.cn/bytecopy-mac/
- Cnet Download: http://download.cnet.com/Pavtube-ByteCopy/3000-7970_4-76177783.html

How to rip and convert Blu-ray under OS X 10.12 MacOS Sierra

Step 1. Load Blu-ray movies

Install and run the Blu-ray Ripper for MacOS Sierra, insert your Blu-ray disc into the BD Drive (necessary for ripping Blu-ray discs) that connected to your Mac computer. Then click the "Load Disc" button to have movies uploaded to the program. Here you can also import DVD folders, ISO files and IFO files to convert. At the bottom, you can select your desired subtitle and audio track.

Step 2. Choose Output Format

Select the output format as you want. With the help of best Blu-ray ripper for MacOS Sierra, you can easily rip Blu-ray to the video formats you desire like Blu-ray to MP4, MOV, iTunes, Final Cut Pro, Adobe Premiere, iMovie, iPhone, iPad, Android, etc.

Step 3. Start ripping Blu-ray

After steps above, tap "Convert" button to start to rip Blu-ray discs on MacOS Sierra. After the conversion is complete, you can enjoy the Blu-ray movies as you like on MacOS Sierra without any hassles. 
Part 2: How to backup Blu-ray discs on MacOS Sierra

1. Add Blu-ray/DVD movie

Insert the Blu-ray disc to the Blu-ray drive or DVD to the DVD-ROM, then click the "Load Disc" button to add videos.

2. Select an output folder

Specify a folder to store backed-up video files in the Browse field. (Note: if you are backing up a Blu-ray disc, please make sure the storage place is around or above 30GB.)

3. Choose and start to backup


Full Disc Mode: Copy the whole content of disc
Choose Full Disc Mode to start to backup Blu-ray or DVD. In fact, the Full Disc Mode feature maintains the entire structure of an original Blu-ray or DVD disc, so the m2ts streams or .vob streams are contained.

Title Mode: Copy the selected movie title
Choose Title Mode. By default, Pavtube Blu-ray Ripper choose the longest title which is usually contains the main movie. And this helps ripping without converting unnecessary titles.

Tips: A title may consist of many chapters. Select Show Chapters from the Edit menu, and then the chapters appear under each title. You can select the chapters which you want to convert.

More Blu-ray Information...

Source: http://macos-sierra-media-converter.blogspot.com/2016/12/rip-and-copy-blu-ray-on-macos-sierra.html

Convert MP4 On DVD Player

It is well known to us that DVD player is becoimg more and more popular, which includes standared DVD player like Sony, Samsung, Panasonic, etc and portable DVD player like Sylvania 9-Inch SDVD9000B2, Philips PD9012/37 9-Inch LCD Dual Screen, etc. You can choose what you want most DVD player according to your needs such as screen size, sound quality, built-in speakers, etc. But when you play MP4 videos on DVD player, you may encounter the following similar problems: 

“I have made an MP4 video with DVD Creator and need to get it to play on DVD Player. But why when I try to put the MP4 file on the DVD player, it says “the file is not supported yet.“ What should i do?” 

DVD player may play various formats: DVD, CD, MPEG-2, Divx AVI. Though you have many MP4 videos, the sad part is that the DVD player does not support MP4 because MP4 is a format with different decodes. So what is the best solution for this problem, will MP4 played on DVD player nicely? Here we offer two solutions for you. 


Method 1. Burning MP4 to DVD player with five steps

MP4, otherwise known as MPEG-4, is a video format that is most notably used in portable video players such as the iPhone, Android, PSP, etc. However, the format is readily acceptable on most video programs you use on your computer and it is even possible to play the video on a DVD player. The only requirement is that the MP4 be on either a video CD or DVD.

1. Power on your computer and launch the CD/DVD burning software. You need to have the MP4 video on a disk for the CD/DVD player to read it.

2. Decide on if you want to burn CD/DVD. This may all depend on the size of the MP4 video file. If the MP4 video is larger than 700 megabytes you need to go with a DVD (700 megabytes is as much as a CD can hold).

3. Select either video CD/DVD on the menu of the burning software. Click and drag the MP4 video into the main viewing screen of the software, title the disk and click "Burn." The burning process will begin. Depending on the size of the video file, the burning process may take a few minutes.

4. Remove the CD/DVD from the computer once it has finished burning. Power the DVD player on and insert the disk into the drive. Turn on the TV and switch it to the video setting for the DVD player.

5.Wait for the MP4 video to load up on the television screen. Press the "Play" button on the DVD player to begin the playback.

Tips: If the MP4 is not on either a video CD or DVD, even if you have successfully burn MP4 to DVD without converting, you will still encounter issues in playing MP4 on DVD player: Regular standalone DVD players can only read movie DVD's (those are in MPEG-2, and if you view them in Windows Explorer, you see a folder structure with VIDEO_TS, and files like .VOB .IFO and .BUP). Newer DVD players that are DivX-certified can (in addition to the above) read data DVD’s with an AVI file encoded in the DivX codec. Most of the time, you will fail to play MP4 on DVD player unless the DVD players have the "Nero Digital" label on them. 


Method 2. Converting MP4 to DVD player supported formats with three steps

Therefore, in order to play all MP4 videos on DVD player, you need a professional MP4 to DVD video converter to convert MP4 videos to DVD player compatible format like DivX AVI, MPEG-2, MPEG-1. Here is a powerful MP4 to DVD player tool - Pavtube Video Converter to help you. (read review)

Below will introduce the detailed guide on how to use this wonderful tool to successfully convert MP4 to DVD player supported videos for playing MP4 on DVD player nicely. Free download and buy the right version of this best MP4 to DVD player Converter Mac version - Pavtube Video Converter for Mac (read review) according to your computer type.

Free download the MP4 to DVD Player converter Windows version:


Free download the MP4 to DVD Player converter Mac version:


How to Convert MP4 videos to DVD Player friendly format?

(Note here we take windows version as an example, and the Mac version steps are same with the Mac version.)


Step 1. Load MP4 files to the Program

Click "Add video" button to add MP4 videos to the program. In case you would want to convert several MP4 files at the same time, just click “ Merge into one file ” to merge them all into one.


Step 2. Select DVD player friendly MPEG-2/AVI as output format

Click "Format" firstly. Then choose MPEG-2 video(*.mpg) or AVI from "Common video" for playing MP4 on DVD Player without any problems.


Tips: You can also click “ Settings ” to customize output video parameters such as video size, video bitrate, audio channels and so on depending on your needs.

Step 3. Convert MP4 to DVD player supported DivX AVI/MPEG-2

Click the big "Convert" to start MP4 to DVD player. When all the work has been done, please click green arrow button to start converting your MP4 files to MPEG-2 or DivX.

Once it is completed, you can click "Open output directory" to find your output DVD folder file. Afterwards, simply import converted MP4 files to DVD player. At last, you can play MP4 videos on DVD player at ease. 


More Information:

  • Play MP4 on Sharp Aquos TV over DLNA/via USB?


  • Convert MTS files to MP4 for Samsung TV


  • The Samsung TV read MP4 movies with subtitles via plex?


  • Best MP4 Video Converter - Re-encode MP4 Files


  • Convert 2D Movie Clips to 3D SBS MP4 for 3D Devices


  • How to Play MP4 Videos in Windows Media Player?


  • 3 Ways to Convert MKV to MP4 for iTunes Playing


  • How To Convert MP4 X264 To AVI To Play On DVD Player?


  • Rip 3D Blu-Ray Disc To 3D SBS MP4 For VR Headsets/3D TVs


  • Best HD PVR Software To Re-Encode PVR Video To MP4/MKV/AVI


  • Make 3D SBS MP4 Video For Homido VR

  • Source: http://mp4gear.over-blog.com/play-mp4-on-dvd-player.html 

    Monday, December 19, 2016

    Pavtube Software Available at 50% Discount in Christmas Deal

    Christmas presents a perfect opportunity to delight regulars and bring in new customers with creative specials. Have you plan to buy something at Christmas? Do you consider perchasing a video tool to transcode your video files? If so, come to Pavtube Studio online Shop. To celebrate this gorgeous 2016 Christmas and New Year holiday season, Pavtube now offers a Up to 50% OFF Christmas and Year-End discount for customers. This sale will last until Feb 6, 2017. People now can buy 20% OFF Pavtube Video Converter Ultimate(Win/Mac), 30% OFF Pavtube BDMagic, 40% OFF Pavtube DVDAid and 50% Off Pavtube DVD Video Converter Ultimate during the holiday season. 

    Let's see how Pavtube software applications functions: 

    Pavtube Video Converter Ultimate for Windows /Mac is the best BD/DVD/Video solution for Windows users to backup BD/DVD, compress disc and transcode video clip to almost all popular video and audio formats. This Video Converter Ultimate can be regarded as BD/DVD backup workaround to copy the entire disc content from hard disc to computer drive and save a complete BD M2TS/DVD VOB movie without extras; it can also be used as a Blu-ray/DVD ripping tool to compress your Blu-ray and DVD collection to MP4, MKV, M4V, AVI and play on iPad, iPhone, Android phones, Windows phones, game consoles, HD media players, and more. What's more, this all-inclusive program is a HD video converter as well, and you can feely convert TiVo, MXF, MOV, and other HD videos to almost all formats. 

    The purchase button of this 20% OFF is here: 


    Pavtube BDMagic for Windows /Mac can convert 2D Blu-ray, 3D Blu-ray and standard DVD to SD, High-Definition formats or even create 3D videos with excellent video/audio quality in fast conversion speed. This BD/DVD to video workaround could output various video and audio formats, like H.265/HEVC, MKV, MP4, MOV, DivX, AVI, MP3, FLAC, etc so you can make a duplicate copy for your video collection, or share movies on numbers of popular media players, like Apple media devices, Android smartphones and tablets, Windows media players, various smartphones and more. Besides, you can easily customize Blu-ray DVD collection to export desired movies in your own patent. 

    The purchase button of this 20% OFF is here: 


    Pavtube DVDAid for Windows /Mac provides the best solution to rip DVD and convert DVD to video and audio in popular file formats for many devices. Along with multiple practical bonus features like video editor, DVDAid is capable of improving your DVD movie experience without location or time limitations. It could backup DVD and convert DVD to various video and audio formats including H.265/HEVC MP4, MKV, MOV, AVI, WMV, MP3, AAC, etc to let you enjoy DVD movies on smartphones like iPhone 7, iPhone 7 Plus, Samsung Galaxy S7, Windows Phone, HTC, tablets like iPad Air 4, iPad mini 4, HD media players including PS4, PS4 Pro, PSP, Xbox. 

    The purchase button of this 20% OFF is here: 


    Pavtube DVD Video Converter Ultimate is an app that allows you to convert standard DVD movies to SD/HD formats, such as MP4, H.264/AVC, AVI, MPEG, WMV, DivX, MOV, M4V, 3GP. Also, it allows users to trim, merge, crop videos, split videos into segments, add text/image/video watermarks and add subtitle files into video clips. 

    The purchase button of this 20% OFF is here: 


    The installation is straight forward, just a few clicks and it is complete. Once installed, upon launching, the main interface is simplistic and fairly intuitive. 

    What a special season! Merry Christmas with our deep sincerity. The Christmas campaign will run from the 14th of December 2016 until the 6th of February 2017. 

    For more information, please visit the page below: 
    http://www.pavtube.cn/pavtube-2016-christmas-coupon.html

    About Pavtube 

    Founded in 2010, Pavtube creates expert multimedia software applications that help consumers access, transfer and share their digital content across different devices that range from PC, Mac, tablets, smartphones to HD media players, game consoles and home theatre systems. 

    On the basis of computer OS, Pavtube products are divided into two categories – Windows solutions and Mac solutions, spanning across video converting, editing and enhancing. 

    With creativity, expert knowledge as well as cutting-edge technology, Pavtube helps consumers throughout the world enjoy more in a digitally connected audio-visual world. 

    Src: http://media-playback.jimdo.com/2015/12/07/pavtube-christmas-great-coupon/ 

    Convert DVD on Western Digital My Cloud for Sharing

    An easy workaround for copying DVD to Western Digital My Cloud for streaming by ripping DVD to Western Digital My Cloud friendly video format. 


    WD My Cloud is a fast, easy-to-use NAS server for your home that includes an excellent personal cloud function. It has a USB 3.0 port for storage extension or backing up data. When you have collected lots of DVD movies, are you planning to backup these DVDs to 
    a video file while keeping its audio and video effect unchanged? This disambiguation article will give you the effective way to put and rip DVD movies onto your WD My Cloud for sharing and streaming with ease. 

    Although WD My Cloud can support a wide range of format like MP4, MOV, AV, due to the reason of lacking DVD drive, WD My Cloud can not meet the demands of put DVD discs online. To achieve this goal, an easy-to-use DVD Converter is the key. Pavtube DVDAid is such a wise choice for you to solve the problem. Read the Top DVD Ripper review for WD My Cloud

    You can rip and convert DVD to WD My Cloud with super fast conversion speed and excellent image and sound quality. It is capable of ripping DVD to MP4, AVI, MKV for NAS streaming with no quality loss; you can easily backup your DVD disk with whole content copy or backup main movie only. If you are running on Mac OS X, turn to Pavtube DVDAid for Mac. If you haven’t got the software, download it now and let’s start the conversion. 
    Free Download this Top DVD Ripper for WD My Cloud: 


    Step 1: Launch the DVD ripping program for WD My Cloud. Then click "Load DVD" to import the DVD files you want to convert. To select the subtitles you like, simply click Subtitle and select the one you prefer. 


    Tip 1: Before start converting DVD movies, you can backup your DVD contend first with its full disc copy or directly copy features. 


    Step 2: As My Cloud is powerful enough to almost all kinds of formats, you can choose the format according to your own needs like MP4, MOV, AVI, MKV, etc. 


    Tip 2: You can click settings button to customize the output parameters, such as resolution, bitrate, etc, you can also skip this step. 

    Step 3: After all settings, click convert button to rip/convert DVD to optimized format for WD My Cloud. Once you've liberated your DVD movie library, you'll make it available for viewing anytime, anywhere just with the help of your WD My Cloud. 

    After all, you can enjoy your DVD movies from WD My Cloud on your Samsung smart TViPad Air 2iPhone 6/6 Plus etc and any portable devices as you want. 

    Read More: 

    Source: http://techmovieshare.blogspot.com/2015/03/rip-dvd-to-wd-my-cloud.html

    Convert Canon Vixia HF G30 60p mts video to AIC for iMovie

    Here is a simple guide for you to convert Canon Vixia HF G30 60p mts video to AIC for iMovie editing.

    I just received the HF G30 and am still working my way through learning how it works. I'm using the iLife '11 version of iMovie on my MacBook Pro and MacPro desktop and neither is recognizing my Canon HF G30 camcorder when I connect it via the USB cable. The strange thing is the Canon icon and SD card icon both show up on my desktop but iMovie isn't recognizing the camcorder as connected and therefore won't import the 60p mts files. 
    When I try to manually import the AVCHD footage from the SD card, iMovie says there are no recognizable files, although the AVCHD files are definitely there (this is consistent with all my recordings and not just on one SD card). I wrote Canon and they have no idea why this occurring, claiming it's an Apple issue. Any idea what's going on and how I can solve it? 

    Canon VIXIA HF G30 Full HD Camcorder 

    Canon HF G30 supports MP4 recording at up to 35Mbps and AVCHD recording at up to 35Mbps. Both formats support Full HD 1080/60p resolution. Plus, images captured at 60 frames per second means that diagonal noise is mostly eliminated - even when shooting fast moving subjects. The camera also supports enhanced color and tonal gradation.

    In fact, the 60p AVCHD MTS file is not an acceptable format by iMovie and then it has to convert them to a format it's able to edit in iMovie. So the best solution is to transcode Canon Vixia AVCHD to iMovie preferred format like AIC mov. If you have got one AVCHD camcorder Canon HF G30, and like editing with iMovie, below is a simple step by step guide for you to smoothly import and edit Canon HF G30 AVCHD 60p .mts files on iMovie editing with AIC codec.

    Download Pavtube MTS/M2TS Converter for Mac

    This best Canon AVCHD Converter for Mac offers optimal conversion by converting Canon HF G30 .mts to Apple Intermediate Codec, which works best in iMovie.

    What's more, the software is a great choice for converting AVCHD videos to iMovie/Final Cut Express/Final Cut Pro editable formats. It works with Sony, Panasonic and Canon AVCHD .mts and .m2ts footage. There are various export format for users to choose from, including Apple’s ProRes 422 codec, Intermediate codec and QuickTime codec. It also lets users to convert AVCHD files into common video formats like AVI, MP4, WMV, MKV, MOV, M4V, etc.

    How to convert Canon HF G30 60p AVCHD to AIC for iMovie on Mac 
     
    1. Connect Canon HF G30 Camcorder to Mac, and transfer the 60p mts files that you want to deal with onto Mac HDD.

    2. Run the Mac MTS to iMovie Converter, click the "Add" button to browse and import Canon HF G30 60p .mts files.


    3. Click the "Format" bar, choose "iMovie and Final Cut Express>Apple Intermediate Codec (*.mov)" as output video format.


    P.S. 

    If you want to transfer Canon HF G30 MTS to Adobe Premiere Pro CS6 and After Effects CS6, choose Adobe Premiere/Sony Vegas> MPEG-2 (*.mpg) for editing. 
    4. Click the "Convert" button and the MTS Converter will start converting Canon HF G30 60p AVCHD MTS files to AIC .mov clips.

    5. When the conversion completes, press "Open" to find encoded files. After Conversion, you can work with Canon HF G30 AVCHD MTS recordings in iMovie natively. 
    Tips:

    1. For your original 1080/60i footages, you need to deinterlace 1080/60i AVCHD footages to remove all these interlacing artifacts from videos via ticking the “Deinterlacing” box in the Video Editor interface.

    2. If the supposed size of the input files is 1GB, then the memory space should be up to 40GB.

    3. Auto shutdown: Click Option and tick the box “Shut down the computer after conversion” before conversion starts.

    4. 3D conversion. The Red-Blue/Red-Green 3D conversions are supported.

    5. Crop: Edit --> Crop and you can get the imported videos cropped as you want.

    6. Double click the imputed file, you can preview your footages in the software window.

    Further Reading: 
    Source: http://pc-mac-compatibility-issues.blogspot.com/2013/08/edit-canon-vixia-hf-g30-60p-mts-in-iMovie.html 

    Thursday, December 15, 2016

    Convert Video_TS Folder to MP4 with subtitles on Mac

    Summary: This article mainly shows you how to ripping Blu-ray Movie to Huawei Mate 9. If you are blu-ray Collector and also have some blu-ray movies, and want to watching them at Huawei Mate 9 check the tutorial now. 


    While the core functionality of a blu-ray ripping is present and works well, this program is missing some of the tools we look for in the best software. For example, you can't use this program to save a blu-ray's file to your hard drive. An blu-ray ISO file is the blueprint of a disc, and saving it to your computer creates a virtual disc that you can use in blu-ray player software. You could also use this file to burn a new copy of the disc without the original. This ability would be good for archiving your blu-ray to Huawei Mate 9 libraries digitally. 

    Streaming your hot movies and TV shows got from internet on a portable device like iPad is a great way to enjoy the free time, but you may be wondering how you can get some of favorite movies that already contained on the Blu-ray Disc to Huawei Mate 9 rather than paying for another copy of the movie. There are plenty of ways to extract the contents from a Blu-ray disc and convert into files that Huawei mate 9 reads well. For today's discussion, we'll use a small program called Blu-ray Ripper, a hassle-free way to convert your Blu-ray disc into MP4 format to Huawei Mate 9 and other diffferent file types in a breeze. 

    Hot searches: Blu-ray to PowerDVD 16 / 3D Blu-ray to 3D AVI blu-ray to Vizio Smart TV / Blu-ray to Oculus Cinema / Blu-ray to QNAP 

    Pavtube ByteCopy is the kind of reliable program that gets the job done. It's simple and sleek, gets around the copy protection on Blu-ray and converts the contents to just about every video/audio format you can think of: Blu-ray to MP4, AVI, MPEG, WMV, MKV, MOV... Apart from converting the Blu-ray to a specific format for Mac, the application also has pre-configured profiles to convert the video for popular devices like PS4, Xbox One, iPhone, iPad, Kindle Fire. It is flexible and customizable and lets you choose subtitles/audio tracks, merge Blu-ray titles or chapters, trim the part of a video, crop video size, flip or rotate the video and other of options. If you are running a PC with Windows enviromentand want to rip Blu-ray to MP4 videos, please use Blu-ray Ripper for Mac

    It is very easy to rip and convert Blu-ray to Huawei Mate 9. This Blu-ray Ripper can rip and convert Blu-ray to Huawei Mate 9 format at world's fastest speed up to 6x more. If want to convert large files in a short time and remove the blu-ray ripping, this blu-ray Ripper is your good choice. And below we will guide you how to use this Blu-ray ripper to rip and convert Blu-ray to Huawei Mate 9 MP4 format. 

    Free download Blu-ray Ripper, install and run this program: 


    Other Download: 
    - Pavtube old official address: http://www.pavtube.cn/bytecopy/ 
    - Cnet Download: http://download.cnet.com/Pavtube-ByteCopy/3000-7970_4-76158512.html 

    The Steps of Ripping Blu-ray Movie to Huawei Mate 9 With lossless 

    Step 1: Insert the Blu-ray disc or drag Blu-ray folder directly if it is on PC or other removable devices into this program. 


    Step 2: You can click Convert from Blu-ray Drive , Convert from Blu-ray directory or Convert from Blu-ray Image File button to load Blu-ray file. Then a small window will and ask you to select the output format, here we choose Huawei Mate 9 supported MP4 format. 


    Step 3: Star conversion, you can check output to Huawei Mate 9 supported MP4 video by clicking "Open the output folder" button. 


    Now, do you think it is very easy to convert Blu-ray to to Huawei Mate 9? Just only several steps. If so, do not hesitate to have a try. 

    Related Articles: 

    Source: http://techmovieshare.blogspot.hk/2016/08/blu-ray-movies-to-huawei-mate-9.html